To make my Matcha tea, I used a milk frother, Midoria Spring Matcha, and a coffee cup. I would've used a tea cup, but since we recently moved and I don't know where mine is, I used a regular mug.
I used a half teaspoon of matcha for a 4 oz cup of tea.
Traditionally, you would use a special matcha whisk. I don't have one, but a milk frother works incredibly well!
The end result is a gorgeous, smooth and frothy cup of green matcha tea. Yum!
The tea sent to me by Midori Spring was of incredibly superior quality, with a very bold taste!
(This review is under construction - I apologize for the inconvenience.)
Hey all! This is another review that will be edited a couple times in the coming weeks while I continue using this product! But first, I need to share with you the video review I did that included this product!
This review includes a product that was given to me for free in exchange for my review. All opinions and experiences are my own.
Hey all!
I just wanted to share with you my demonstration & review of the Mixologist World Cocktail shaker I recently received.
Just a few key points that I loved. 1) No leaks, both the lid and the cap seal really well. 2) Measuring cup does both 1 oz & 1 Tablespoon 3) Stainless steel, great for quick dishwasher cleanup. 4) Comes with recipe book and e-books for recipe ideas. 5) Built in strainer.
This shaker was provided to us for review at no cost, we were not paid for this review. All opinions and experiences are our own. Thanks!
Hey all! Later this week I'll be making soap again, but I've been busy all weekend preparing a new review video (hey, Test Kitchen Thursday doesn't NEEEEED to be on Thursday!) and such. This review here though is just for the blog because the video content was very short and will be embedded here!
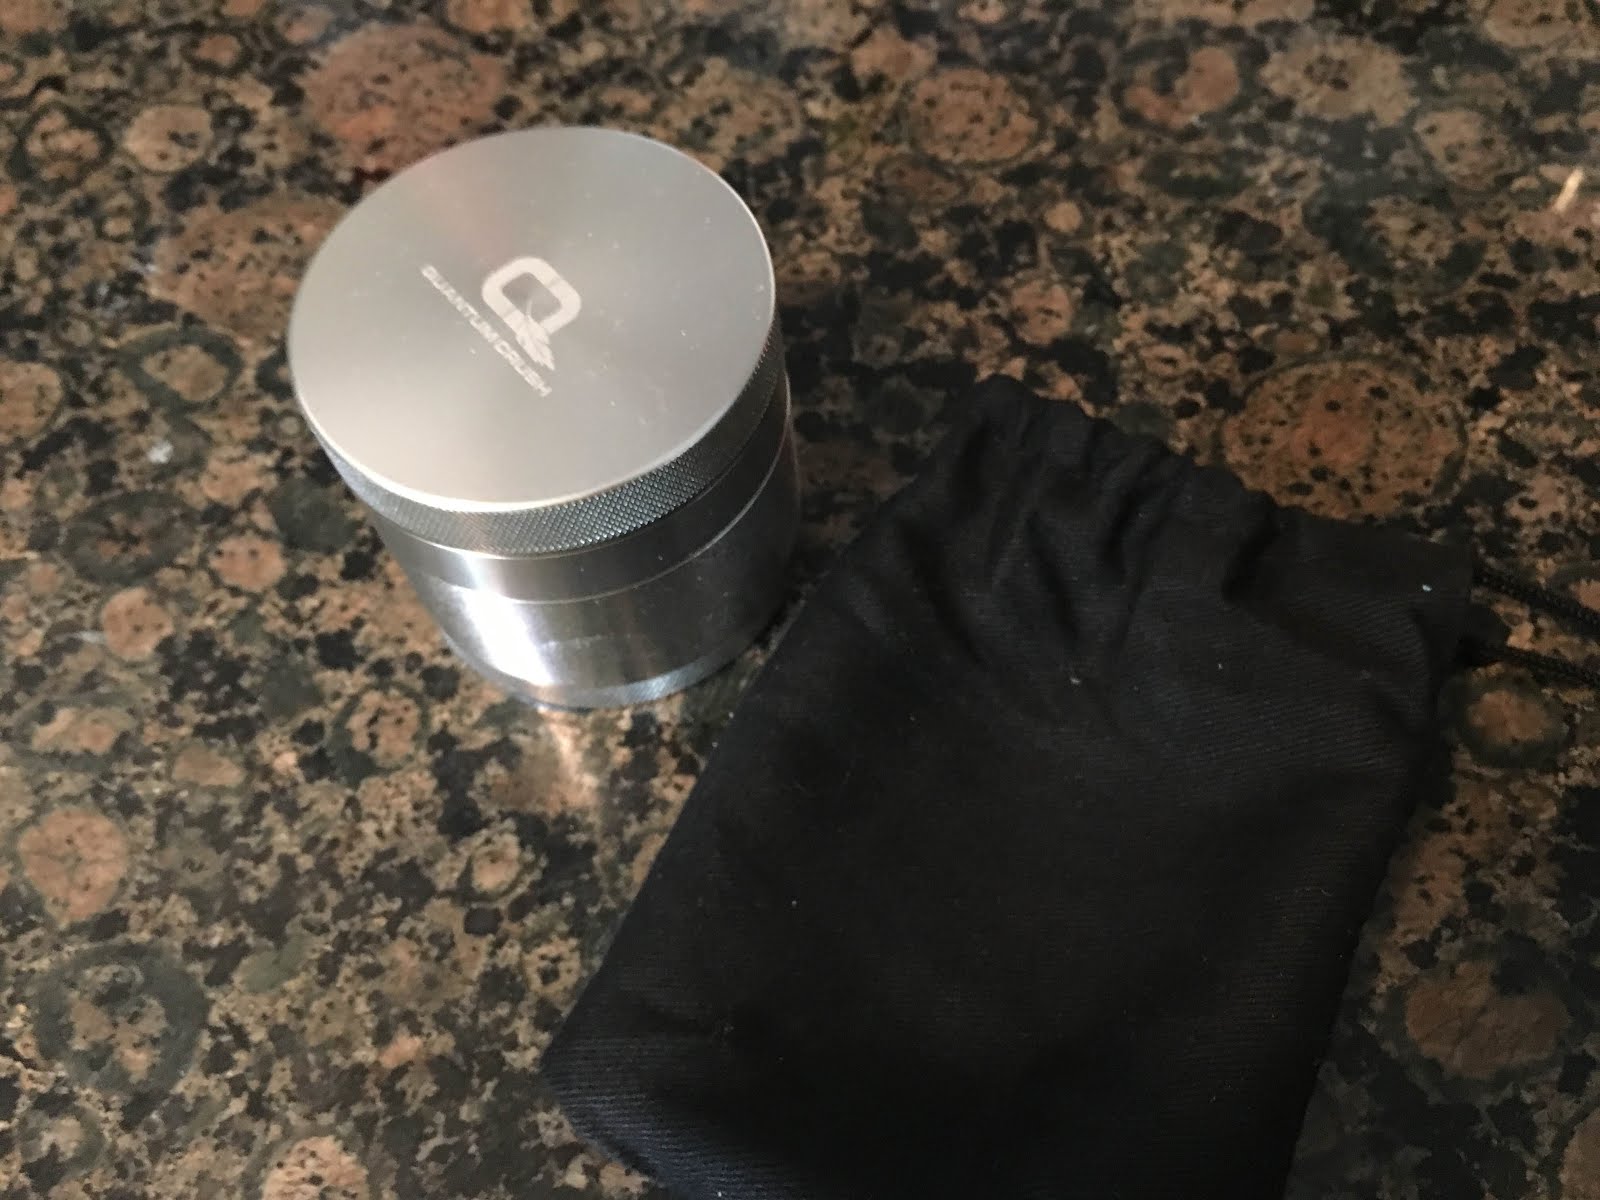
So Quantum Crush sent me this herb grinder and I'm pretty sure it's probably used for grinding up *cough* medicinal *cough* herbs. But I care zero as I know I'll find great use for this in my kitchen.
I'm demonstrating in this video how to use this to grind Rosemary as well as how to use this to grind peppercorns if you don't have a pepper grinder (or if your pepper grinder broke like ours!)
Again, if you missed that last bit on the peppercorns. Make sure to use the grinder upside down (put peppercorns in the lid!) otherwise the little peppercorns will just fall through the holes!
I definitely loved this little thing and will give it a 5 star review on Amazon, where you can purchase your own!
I only had one complaint and that's that the little black bag it comes in is basically pointless. It took me five minutes to get it out because it's TOO small and I definitely won't be able to fit it back in. I'm not reducing a star for this extra, useless item but I do hope they either switch to a bigger bag or just remove it from the product packaging entirely.
This product was provide to me free of charge in return for my honest review, all opinions and experiences are my own and this little demonstration was a bonus for you!
If you watched the most recent episode of Thursday Test Kitchen, you'll see I reviewed a vegetable steamer product by Sunsella.
I wanted to elaborate a little on my review that I did in that video by sharing a few photos showing the features I liked AND the features I disliked on this item. If you haven't watched the TTK from Nov. 19, I've embedded the video here for your convenience (and if you're not subscribed to my channel, click here to do so!)
Without further ado, a few photos of my favorite (and unfavorite features!)
I LOVE that this is stainless steel. It cleans up great in the dishwasher and like my favorite steamer that my grandma had when I was growing up, it's of the traditional fan out style.
I do NOT like that there are no feet covers to protect my nonstick pans. This product could benefit greatly from some rubber or silicone feet covers. I won't be giving this full stars because I can't use this steamer in more than one of my kitchen pans.
Overall this is a great product, it's quite large and holds tons of veggies! I do recommend this steamer, just don't expect to use it on any type of non stick coated pan.
As mentioned in the youtube video, this product was sent to me in exchange for my honest review. As you can see from this detailed blog post and the video, I did test this product prior to making a decision on how I feel about the product's performance. All opinions are my own.
Hey all! I just wanted to share a quick video review I did recently of the KUKPO potato masher.
Watch this video for a demonstration of me using it during our Sunday dinner prep!
I definitely recommend trying out this potato masher! You can get yours on Amazon (click here!)
FTC: I was given this potato masher for free for this review, as you can see in the video, the demonstration is real. All opinions are my own. <3
This a bit later than I planned on posting this, but that's due to the incredible amount of setbacks I experienced during this challenge.
It started when, about 4 weeks ago I learned what the new, November Soap Challenge would be and decided I wanted to participate. I went and bought everything I should need and waited for registration to open. The morning of October 26, right before registration opened, my husband texted me telling me he was on his way home, he'd been laid off. The oil & gas service industry is really rough right now, and my husband, a geophysicist, just couldn't be kept on due to major budget cuts.
I seriously considered not doing the challenge, I mean, $6 was still money and it's a meal if we ended up needing it. Then, the supplies showed up on my doorstep. I paid the registration and watched the tutorial a dozen times. I needed to do this, I needed to make soap to make me feel better and I thought if I had a chance at winning, then the prize would surely help me continue making soap while we crunch the numbers on affording to live in the meantime. Besides, did I mention making the soap just kind of makes me feel better?
Anyway, I got to work making soap right away. My first batch was beautiful but NOT good enough! The trace came too quick and it didn't *shimmy* enough. This is the tall & skinny shimmy! I couldn't just ignore a necessary adjective! I immediately ordered more fragrance for as cheap as I could find and got to planning the next batch.
The second attempt when awful. I decided to avoid stick blending it and just stirred it to emulsion. Or rather, not emulsion. It was poured beautifully and looked gorgeous, but it wasn't mixed well enough and, well, you can watch my youtube fail video here.
The third attempt was unscented, I felt weird about making a pretty, colorful soap, with no scent. But I decided I needed to keep trying and wasn't going to let being out of fragrance get in my way. I stickblended a *little* bit and poured, hoping for the best.
Please view this video to see the process!
(My iPad hasn't been very friendly with uploads lately, so this is in two parts.)
Part 1:
Part 2:
Alas, I have achieved a beautiful tall & skinny shimmy. But then here's where more trouble began brewing in my mind. It was beautiful to me, but as my 9th soap ever, I just assumed it couldn't possibly be good enough. I went into the soap making forums I am in on Facebook just to prove to myself that my soap is good enough. I saw several other T&SS participant's soaps. They're gorgeous! Self doubt began to creep in. I shut off the computer for a whole day. I decided to enter the soap anyway. You can't win if you don't play. <3
Welcome to the test kitchen! For the last week I've been testing out a really cool product, now available just in time for CHRISTMAS! You guys, I'm SO excited about this, I've been recording my experience using these really cool silicone molds and have put together a compilation of the things I've made with them!
I do want to make note of a few main points to recap what I discussed in the video.
- I did NOT use any baking spray or oil during any of these tests.
- When releasing, gently pull the sides of each cavity first and then turn over and gently push the bottom.
- I cannot recommend these for jello/gelatin desserts, that doesn't mean you may not have luck with them, but they didn't work for me.
Overall, I recommend these for making ice, holiday baking, soap making or crayon making, and chocolate/candy making. This is a fabulous product & I think I'll get a second set so that I can keep one for soap making and a second one for the kitchen.
FTC Disclosure: Products were provided to me free of charge in order to supply a review for the product. All opinions are clearly my own as demonstrated above. Links to purchase products are likely affiliate links.
Recently I've taken a liking to making my own soap. I've researched cold process soap making for over a year and it wasn't until just the last few months that I've been really ready to make my own. When I heard about the Great Cakes Soapworks soap making challenge, I knew it would be something I should try so that I could learn even more about this skill, or rather, art form. I signed up for the email notification so that I would be able to register for the next one and I waited.
When I got the email announcing the theme would be "alternative liquid" I KNEW this was right for me. Just the day before getting that email, I had made my own salsa and had saved the juice in my freezer. I registered as soon as I settled on a recipe and ordered myself a soap mold! (Prior to this, I had only done two soaps and had just used recycled boxes lined with plastic bags.)
When I realized the soap mold wouldn't arrive in time to make and enter the video into the challenge, I quickly found a container I could recycle to use and went to town making my soap!
Here's the video of me doing that, please go watch it and leave feedback here or comment on the video - (and yes, I know the lighting is a little dark but still very easy to watch!)
Tomatoes Are Amazing!
Now as for why I chose tomato juice for my alternate liquid, that's because I had it. But that doesn't mean I didn't want to do a bit of searching into the cosmetic benefits of tomatoes. According to a research study done at the Royal Society of Medicine in London, consumption of tomatoes, specifically tomato paste, has significant benefits in protecting your skin from the sun's UV rays.(1)
The lycopene in tomatoes is also studied and some results have shown that it can provide relief of oxidative stress in people with diabetes. (2) Again, this study likely focuses on the consumption of tomatoes rather than the use of tomatoes cosmetically.
According to this hair boutique article, if one were to apply tomatoes to their face, it could help maintain the skin's moisture & balance pH levels. In fact, Burt's Bees has an entire skincare line dedicated to highlighting the benefits of tomatoes for the skin. (3)
Please review the references I'll cite below for more information. Thanks so much for reading and to Amy of Great Cakes Soapworks, thank you x1000 for the incredible learning opportunity. I look forward to making more soap, I juiced some oranges today, dried and ground the rind, and dried the remainder of the inside to infuse in oil. I'll be making an orange soap in the near future!
Edited slightly to help show the truer color.
This girl happily entertained herself with a spoon while momma edited her video!
Thanks for your patience my darling!
References: 1)Hope, Jenny. "Tomatoes 'help Keep Skin Young' and Protect against Sunburn." Daily Mail Online. Associated Newspapers, 07 June 2012. Web. 13 Oct. 2015. 2) Valero, M. A., A. Vidal, R. Burgos, F. L. Calvo, C. Martinez, L. M. Luengo, and C. Cuerda. "Result Filters." National Center for Biotechnology Information. U.S. National Library of Medicine, 26 Nov. 2011. Web. 13 Oct. 2015. 3) Shelton, Karen Marie. "Tomatoes In Your Face & In Your Hair: Beauty From The Garden." Tomatoes In Your Face & In Your Hair: Beauty From The Garden. HairBoutique.com, 26 Sept. 2009. Web. 13 Oct. 2015
What do you do when you have most of a cabbage left over because you only needed one leaf for your last project? You eat it! Or ferment it! (Or both!)
Here we have the two ingredients I need for making my own kraut.
I used 1 small head of red cabbage (about 6" in diameter) and 1-2 tablespoons of kosher salt.
I'll include links at the bottom for where to get some of the tools to help make this job a lot easier.
Chop it all up and put it in a bowl, sprinkling salt between layers. One layer was about 1/4 of the cabbage.
Here's my full bowl of cabbage. Put the lid on the container and let it sit for 15 minutes, shaking it vigorously every 5 minutes. This helps the salt get the juices from the cabbage flowing.
Start packing your cabbage into your jar. Get a pickle packer or other pushing utensil. In order to pack the cabbage down aggressively enough with my hand, I ended up breaking my jar and wasting about 1/2 cup of cabbage. Darn it! That was a good, wide mouth pickle jar. :(
Rescue another jar from the recycling bin, this time it's a tall pasta sauce jar. Pack the cabbage in as good as you can, it's important to pack it in firmly, this helps get the juices flowing well and helps you fit enough in the jar. If I hadn't packed it in well, I estimate it would've taken up twice as much room.
Find out that your pickle pebble (glass weight) doesn't fit in the top of a pasta jar. Cry.
Fill a snack baggie with sand and use that instead. Curse the jar gods for making your good wide-mouth jar break. Remind yourself to always use a pickle packer instead.
Cap off the top with a clean cloth (a paper towel works if the one you'd planned on using got thrown away due to broken glass fragments.)
Now let that baby sit for 3+ days to ferment nice and juicy!
Hello! This week we're making more jams, papaya and peach. I thought I'd get a head start on orders by making some of the papaya jams a day early!
Here I'm de-seeding the papaya and removing the fruit from the rind, taking care to avoid adding in chunks of the inedible rind as well as the stringy fiber from around the seeds. Neither would add any good flavor to the final jam.
Mashing is a two-part process to make sure there aren't any huge chunks!
Now, with a little orange juice & pectin added, we're cooking this jam!
All done! My jam taster thinks it's delicious and even requested it in a sandwich for lunch!
Yummy! Today's batch made 6 full jars. We almost had a 7th, but since it wasn't completely full, I refrigerated it and we're keeping it all to ourselves.
Check here to see if there's still some jam available and how to purchase! (Houston area only!)
Make your own! I used this recipe here and it worked out great, I did use 1 cup less sugar because I used Ball Realfruit Pectin. :)
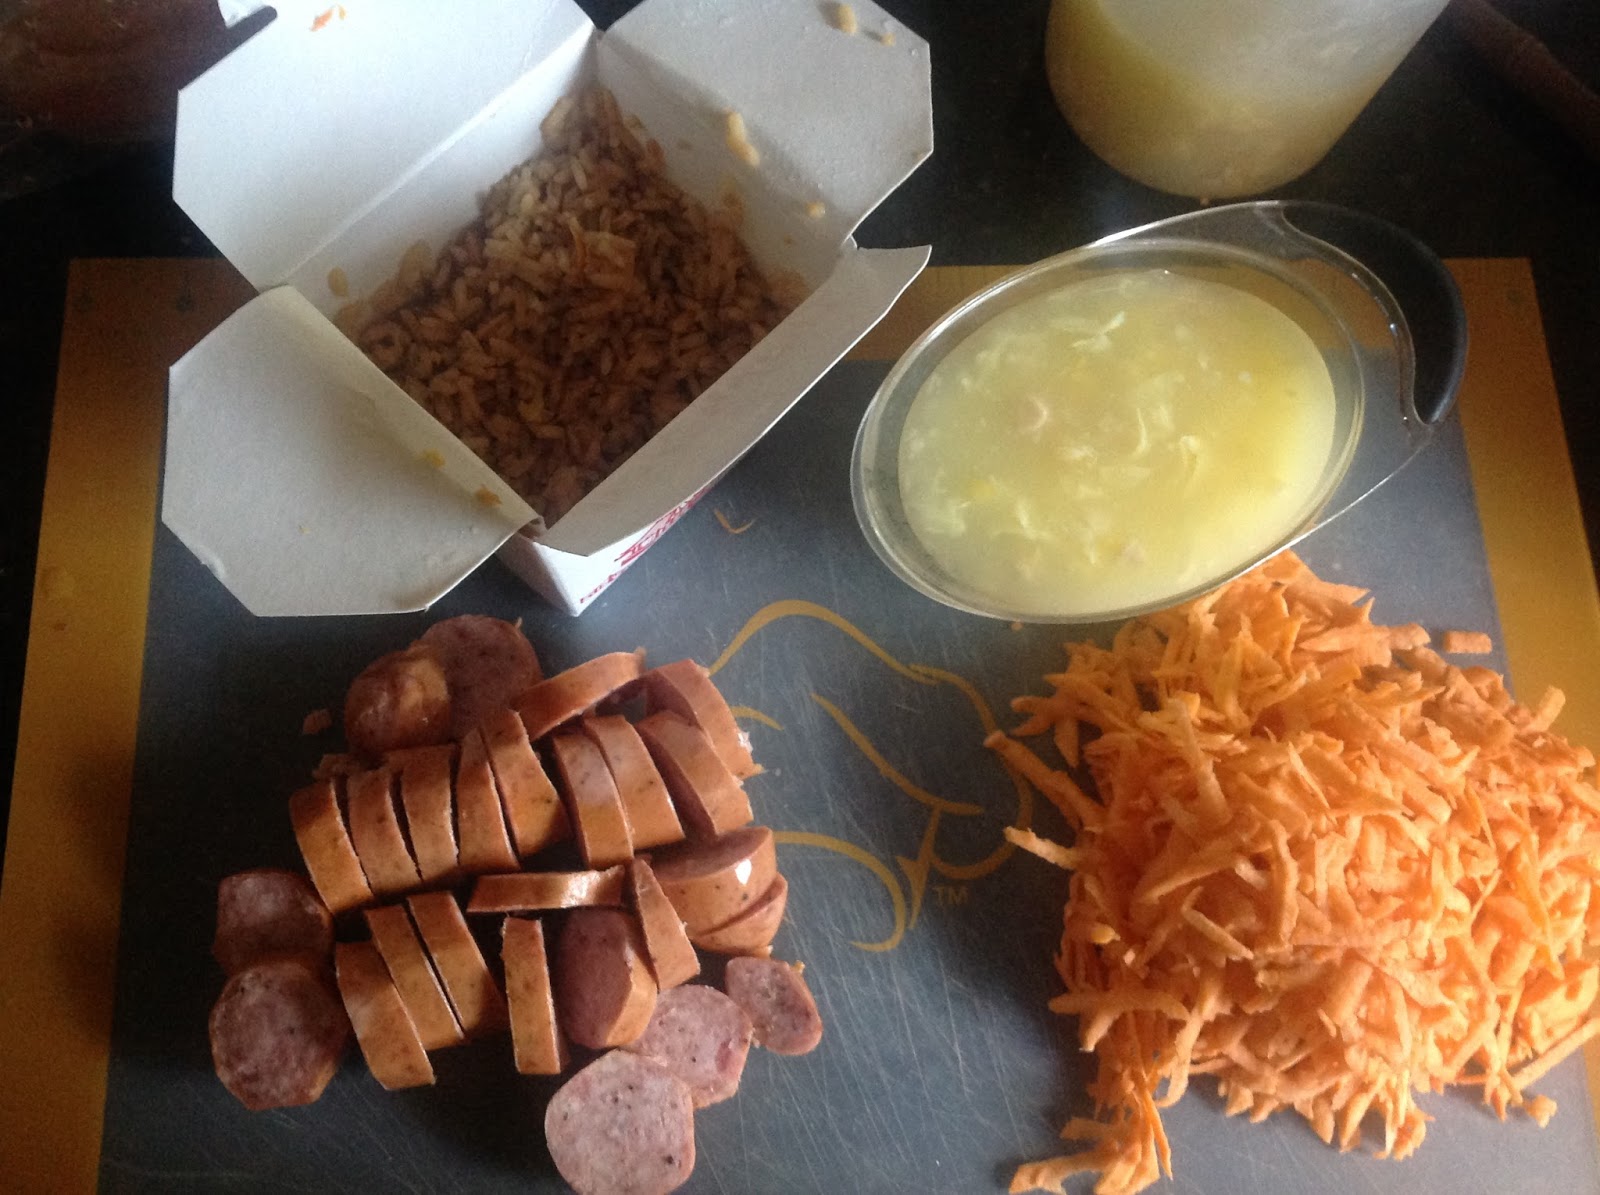
This is my absolute FAVORITE way to use leftover rice & the only way I eat egg drop soup (I'm weird and don't like it any other way.)
Ingredients:
1 cup of leftover rice (about 2/3 of a standard small takeaway container)
1 cup of egg drop soup (my local place actually has a chicken corn egg drop soup, that's what I like with this)
1 medium sweet potato grated
1 cup of chopped meat protein (optional - I have made it without and it's just as yummy!)
This yields about 2 servings.
Step 1: Peel and grate potato & chop meat if using.
Step 2: Heat olive oil in skillet, medium-high. Add potato & meat. Let cook, stirring occasionally, for about 2-3 minutes.
Step 3: Add rice and pour soup over everything. Stir well.
Step 4: Let cook 3-4 minutes, until some of the liquid has evaporated and the consistency is like a rice casserole.
Step 5: Eat!
Watch this time lapse video to see how I cook it!
Yesterday I whipped up TWO batches of strawberry jam! A couple ladies in my community wanted some jam so I set about making two different batches, one with the ever time consuming homemade pectin, and one with my favorite Ball RealFruit Pectin.
Here's the berries before, I started with FOUR pounds for these batches:
And hulling:
And after I finished (several jars are already packed up for the pre-orders):
Half the jars were pre-sold and ready to drop off this weekend! Right now through 9/27, Crafty's Jam & Marmalade class is 50% off!
I just wanted to do a short review of this pizza cutter!
It's a rocking style pizza cutter and works fabulously! I really like that there's a hole in the top of the blade so I can hang it up. The easy rocking motion cuts the pizza quickly and without excessive pressure from my wrists (like a traditional pizza cutter would.)
Here's a demonstration of me using it.
Needless to say I LOVE it! If you'd like, you can get your own here (this is my affiliate link - it takes you directly to the product page!)
This product was provided to me at a deep discount for review. Opinions are my own.
Wooo! Hey y'all! I’m a member of the Crowdtap Folgers® rewards program, and Folgers sent me a sample of its Folgers Flavors™ Coffee Enhancers to review. So because it's too early in the morning to actually try to take pretty pictures and getting coffee in thine body is my first priority, I made a video to share my experience! Scarlet, my 4-year-old, decided to help out as well! Enjoy!
To join the Folgers Wakin Up Club for Coupons, Recipes + more, go here!
Whooop Whoop! Finally got the domain registered, content is coming soon! Look forward to posts like the following few I have planned!
How to Make Vanilla Extract
Eating on a Budget: Rice
Eating on a Budget: Potatoes
Growing Your Own Potatoes: Suburban Living
As well as recipes for the following!
Jams & Jellies (Cranberry jam!)
Potato Salad like Momma Makes!
Quick Breakfast Snacks
Salsa & Sauces (And how to choose peppers @ the grocery store!)